DIY Gravity Setup with the Sawyer Mini
Early in 2016 I started using a Sawyer Mini as my primary water filter for hiking and backpacking. It was a huge weight savings, going from a one pound MSR down to a little thing that weighs a hair over two ounces. However, I immediately ran into two problems while using it. I couldn't come up with a good way of collecting dirty water, and forcing water through the filter was tedious.
See, the Sawyer is just a filter. Unlike many of the other options on the market, it doesn't include a hand pump to pull water up a hose and push it through a membrane, nor does it come with a gravity setup to force dirty water through. It comes with a flimsy squeeze bottle that you are can dip into a puddle, screw the filter on, and then push to get clean water out the other side. This doesn't work so well in practice - I rarely find a convenient puddle deep enough to dip the squeeze bottle in to fill and squeezing a half liter at a time (the included bottle size) can be very time consuming. So I decided to play around to make a DIY gravity option.

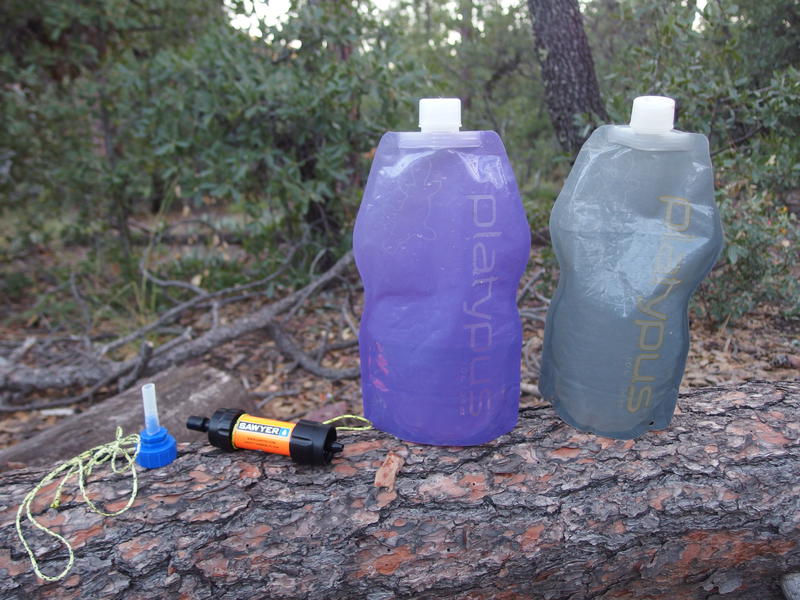
The basic water system for a gravity-based Sawyer filter
The first thing I switched out was my water containers. Platypus has some great one liter plastic bottles that weigh about an ounce apiece - more reasonable than a Nalgene or Camelbak bladder. Plus they come in different colors, so I can use a gray bottle for dirty and blue/purple/clear for clean water. They are more rigid than the Sawyer squeeze bottles, which makes them easier to dip to fill, though I also bring along a homemade collapsible cup to scoop water up. The cup is just a standard plastic water bottle cut in half - they crumple up wonderfully flat.
These bottles helped with scooping water up and containing, and they also screw on to the filter, so now I can fill one with dirty and squeeze it into another one. I still wanted to use gravity, though. In the end all I had to do was add three more components to my two bottles-and-filter system: a nozzle to screw onto the clean bottle, cordage to keep the clean bottle attached, and cordage to hang the whole thing up.

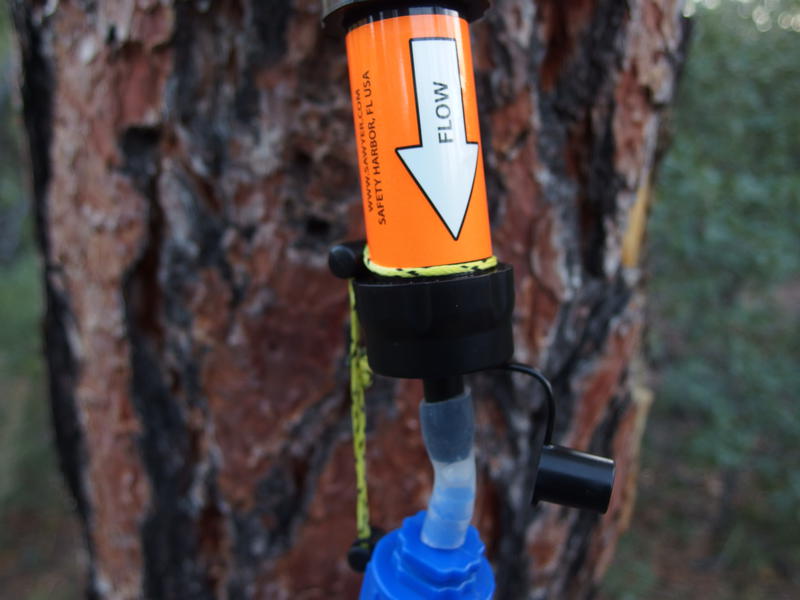
Sawyer Mini in a gravity setup
First, the nozzle. This solution I rather like, because it doubles up as a backflush. I use an inline adapter that can screw onto the clean bottle, with an inch or so of flexible hose on the end, and this hose can plug right in to the clean end of the Sawyer Mini. This creates an end-to-end seal with the dirty water bottle, with the filter flow pointing straight to the clean end. Also, for backflush, all I have to do is attach the clean bottle with clean water to the output end of the filter and squeeze - no more carrying along the included syringe.
This connection isn't strong enough to support a full liter of water, which is why I have the cordage connection. It's a simple loop with one end around the filter and the other around the base of the adapter. I use some mini cord locks (from Z-Packs) to keep these tight without monkeying too much with knots.

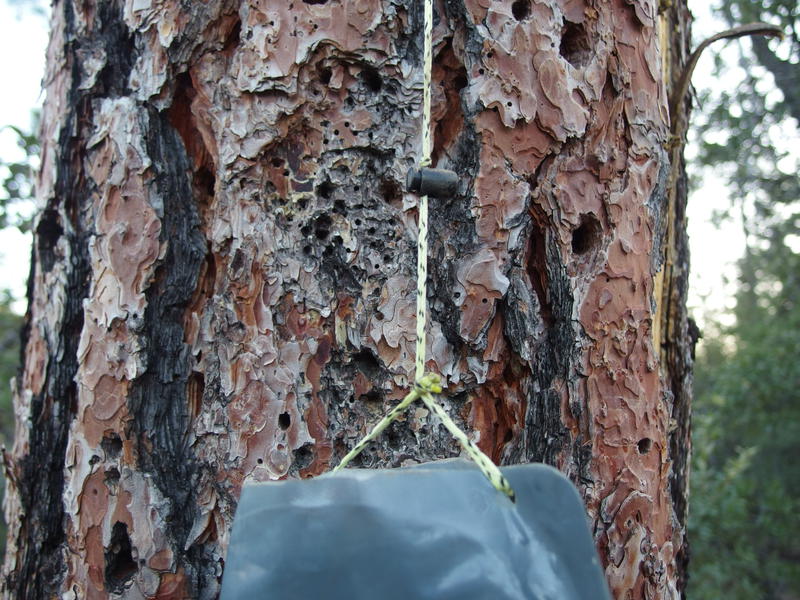
Simple, versatile hanging system
The last piece is the cordage hanging the whole thing up. Platypus bags have a thick base to be self-standing, so I just punched some holes through for the cord. I also chose to tie a loop and thread the whole thing through, allowing me to loop the ends easily. One more cord lock here as a base for the hold and I can hang this from a long branch, and the whole thing can be pulled out for storage if I don't want it dangling in between filters.

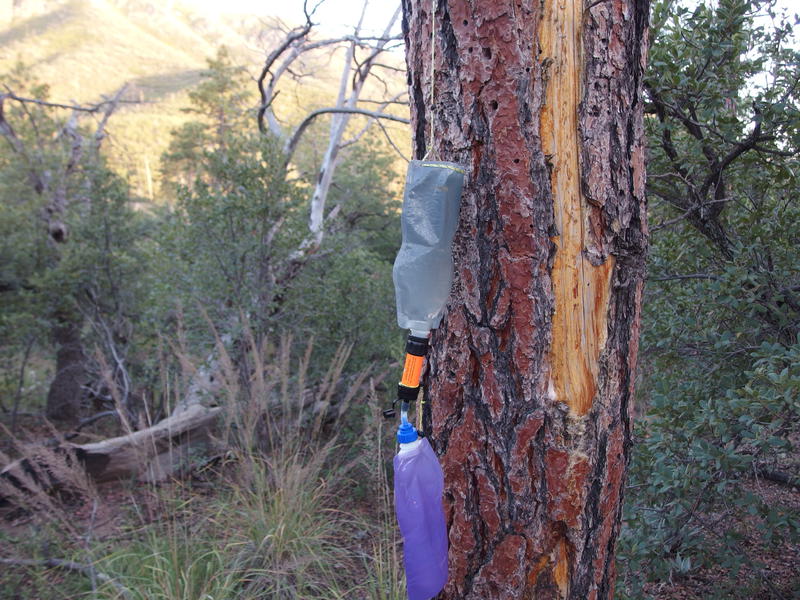
The entire gravity setup
All together this solution costs around forty bucks (depending on what sales you can hit), has two liters of capacity, weighs five ounces (dry), doubles for both squeeze and gravity setups, and includes a simple backflush. The gravity setup will filter a liter in about ten minutes, which could be sped up with using a longer connection hose. It's a lot of parts and, because there is an end-to-end connection through the whole thing, I do have to be careful about making sure the dirty bottle on bottom doesn't have air in it or the pressure below will cancel out the gravity above. For the versatility and the weight, though, I'll happily deal with the shortcomings.


-
Jacob P Emerick
Oct 5, '16
Yeah, there are some good dedicated setups out there. I chose not to go with them, though, because I'm only carrying 2-3 liters capacity on most trips, which means I frequently need to stop at a spring along the trail and pull a few liters and then keep going. Always pictured a dedicated setup being a better fit for camp or during longer rests instead of on-the-go.
-
dcclark
Oct 5, '16
Yeah -- we don't tend to filter water unless we're stopped for the day, or at least taking a looooong break. And after (oh, just saying) 12 miles on Isle Royale, there's no way I want to operate a hand pump!
-
Jacob P Emerick
Oct 17, '16
Oh, so hear you on the hand pump. I was cramping up something fierce at Todd Harbor and severely needed to pull some water and my arms/hands were not feeling it at all. Things got better after that, but Isle Royale taught me that a gravity pump can very much come in handy (also, having more than one liter of water capacity!)
-
Jeanine
Jul 3, '17
I saw this post, and wanted to add a more sturdy suggestion for the gravity system with the Mini. I attached the included straw (cut in half) to the clean flow side, then fed the straw through a Tornado Tube and duct taped it flush to the filter. The included straw is the perfect size to fit through the tube. My only concern now is disassembly for backflushing, or if I can find a method to backflush without removing the duct tape. But for an added $3, I don't feel like I wasted a lot of money trying it out. Also, if the tube isn't screwed on all the way (letting a little air out), the flow goes much faster.
-
Jacob P Emerick
Jul 17, '17
Hi Jeanine, thanks for the suggestion! I've had issues with the airflow, of reverse air pressure not allowing all of the dirty to filter through, and usually have to hand-press the last handful of water out. This sounds like a good way around it :)
-
Fast Hiker
Sep 30, '17
Sawyer doesn’t stand behind warranty - Go with PlatypusFollowing the post-hike cleaning recommendations direct by conversation with Sawyer's customer service (vinegar and/or hot-water) did not clear the filter. Though Sawyer Warranty Dept asks you to package well(bubble-wrap/shock absorption inside sturdy cardboard).. If they do repair it - they return it without bubble wrap, and it'll even get loose, banging from side to side in the return box (excessive shock for a filter). You're left with a filter of unknown reliability - which if you call for replacement - they'll do nothing. Skip buying a toss and replace filter - for buying from a Company who'll send you a free filter/parts on issue, like Platypus.
Add to this discussion-
Jacob P Emerick
Aug 3, '17
Nice! It sounds like you get a much better flow rate than I do by not restricting the air flow coming out of the clean water. Takes me longer for a liter, and even then I often need to squeeze the last few handfuls out.
Add to this discussion